-
Hover the mouse over the Enhanced Search widget and click the small edit icon

The configuration window for this widget opens.
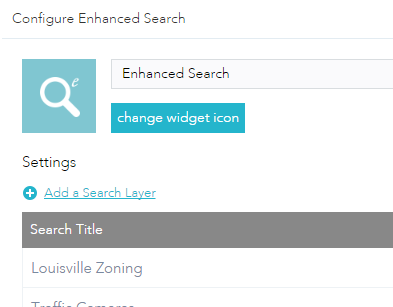
- Optionally, click change widget icon if you want to replace the default icon for this widget.
A file explorer window opens allowing you to browse to a local image file to use as the widget icon.
- Click Add a Search Layer under Settings.
The new search dialog opens. Now enter the Search URL of the service layer that you wish to use in the search.

Once you have entered the url, click into the next field or press enter in order to load the layers fields into the Available Fields grid.

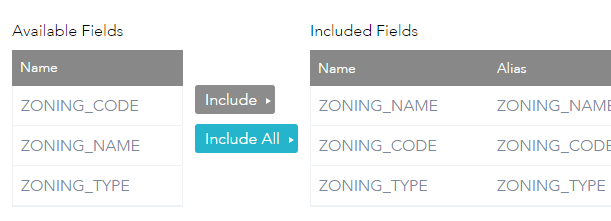
- Select individual fields from the Available Fields grid and click the Include button or just click the Include All button to add all the available fields to the Included Fields grid.
- Next choose one of the fields to be the Title field by selecting the radio button for that field.

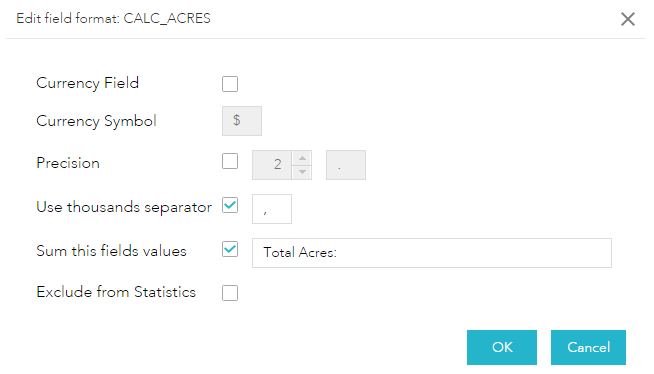
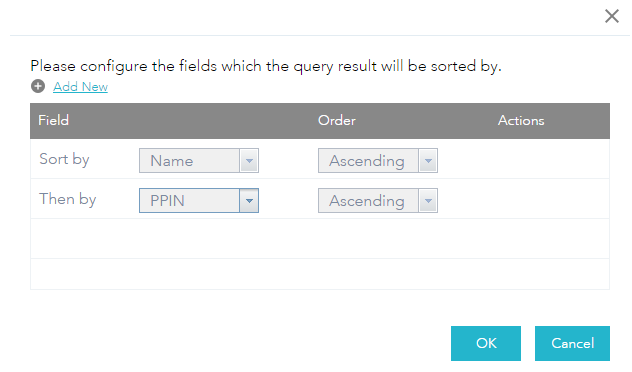
- Optionally set Result Item Sorting by clicking the pencil.

This will bring up this dialog to allow you to add fields and choose the sort direction.
- Give your search a Title.
- Optionally enter a Definition Expression.
The Definition Expression is a string that will validate to an actual SQL expression (i.e. Upper(Field_Name) = 'ROBERTS').
- For example:
- • You might want to search only cities with a population above a certain threshold.
- • Many datasets, such as roads and street datasets, have subsets of features (classes), and you might want to define search layers for each class of roads independent of the other features..
- • In another case, you might have large enterprise databases with datasets that contain millions of features across wide extents—say for a whole nation or state. Yet, in your search, you might want to work with only a subset of that data.
- Optionally check the Spatial Search Layer checkbox if you want to alow this layer to be included in a spatial search.
- Optionally select the Layer Symbology option you want the layer to have. The default is from Server which means that the layer symbology will be drawn from The ArcGIS Server map services symbology. from Config means that the widgets default symbology for the geometry tupe will be used. from Layer means that the search results for this specific layer will be drawn using the symbology specified by the layers symbology configration. To add or edit that layer specific symbology just click on the Add\Edit Layer Specific Symoblogy button.
- Optionally set the Zoom scale if only set the zoom scale then this will only apply to point geometry results, but if you also chack the Force Scale then the zoom scale will be used on all geometry types.
- Optionally select the Add result as opertional layer if you want the layer to appear in the Layer List Widget and/or Attribute Table Widget
- Optionally select the Show in Attribute Table Widget if you want the search results to automatically open in the Attribute Table Widget.
- Optionally select the Auto zoom to search results and/or Disable search results popup if you want to override the widgets global settings for these option for this layer only.
- Optionally select the Show Attachments if you want the search results popup info window to have a link to the features attachments.
- Optionally select the Hide Null data in widget results and popups if you want the search results and popups to not contain any fields that have no data.
- Optionally add search link(s) to your search by clicking the Add Link button.
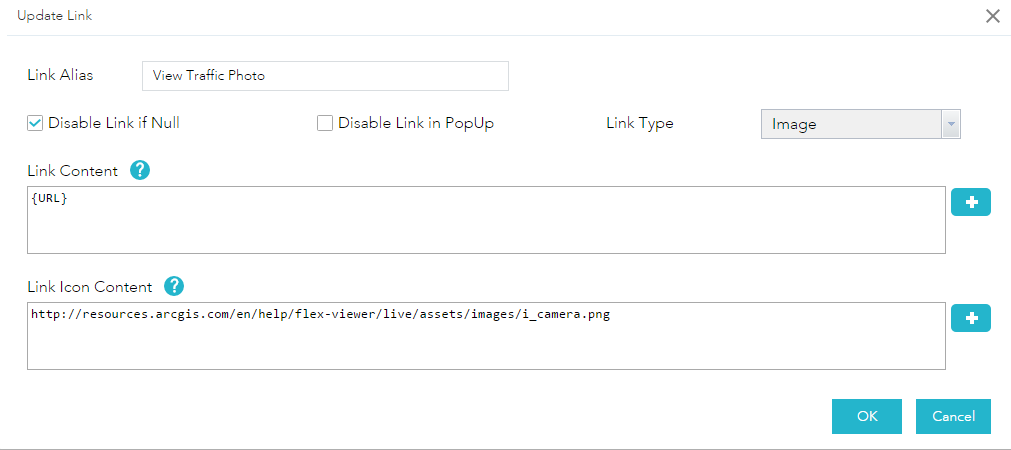
Give the link an alias and configure the other link options like Disable Link if Null which will prevent the link from showing in the widget if the link field is null, and Disable link in PopUp (self-explanatory), and PopUp Link Type which assigns the link as a text hyperlink in the popup or and image link.
Set the Link Content by assigning static text that represents the link url (i.e. http://www.esri.com) or clicking the Plus button to add a field from the search layer that contains the link url. Do the same for the Link Icon Content.
- Optionally add search relate(s) to your search by clicking the Add Relate link.

Give the Relate an alias and add the fields you want to appear in the results.
Select individual fields from the Available Fields grid and click the Include button or just click the Include All button to add all the available fields to the Included Fields grid.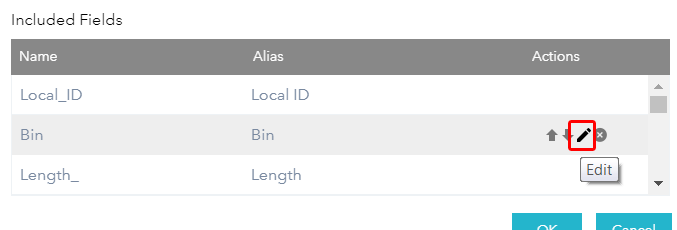

- Click Add Expression to display the individual expression dialog.

Enter an Expression Alias and a Search Label
Next click the Add Expression Value to display the expression value builder.

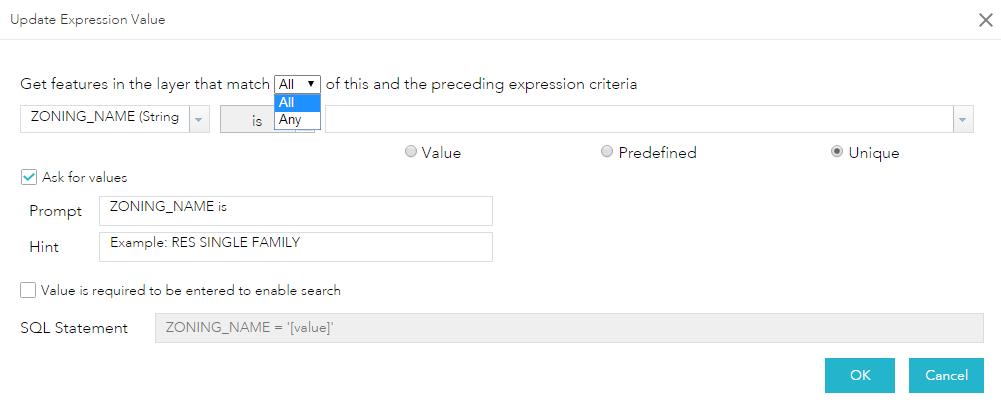
- Select a search field, an operation, and provide a value in the text box. Optionally, check the Unique option to list all unique values for the selected field in the data layer. This option is handy when your selected field is a string or number. You can also use the Predefined option that allows you at build a list of predefined values for the user to choose from (option only available if Ask for values is checked).
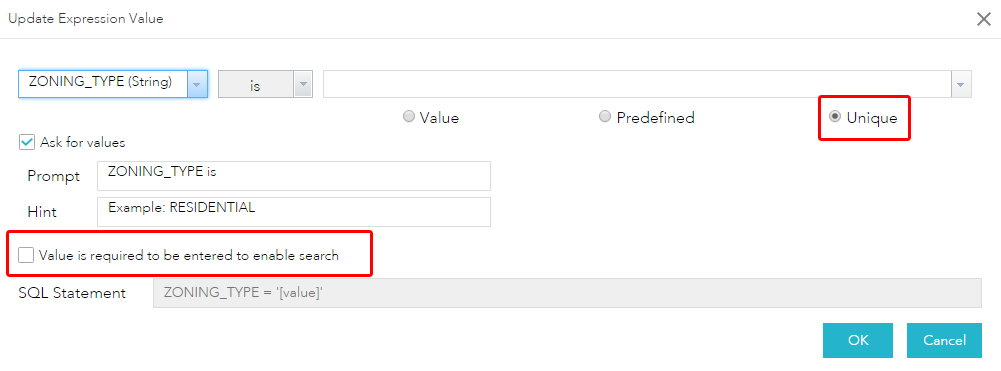 You can check the Value is required to be entered to enable search option and this will force the use of this expression value. If this option is not checked and the user does not enter a value, then this portion of the expression will not be used in the final SQL that is submitted to the server.You can also use the Predefined option that allows you at build a list of predefined values for the user to choose from.
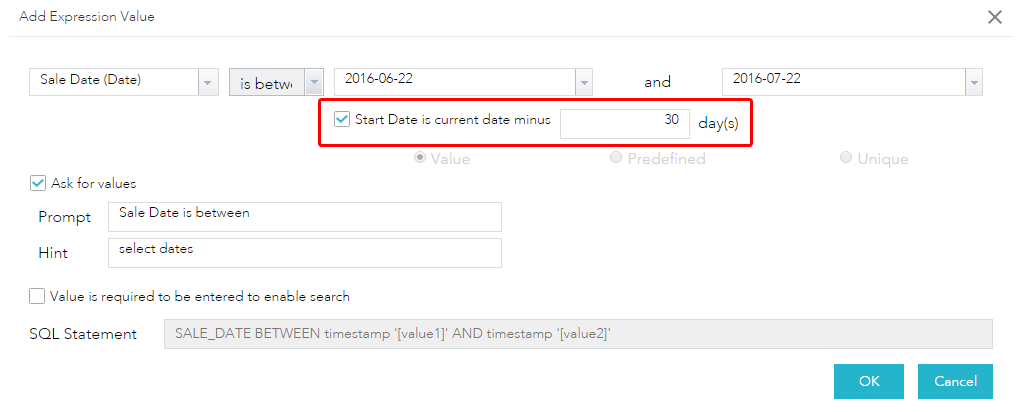
 Click the Add List Value button to add a row to the Predefined Value(s) grid. To add the text to the new row that was created, double click the row and enter your predefined value into the textbox.If you are searching a date range is between or is not between then you can specify that the start date (by default the current date) have a defined number of days subtracted from it. By checking the Start Date is current date minus and entering a number of days the date range can be set to be a certain date span (i.e the last 30 days).
- Optionally, check Ask for values.
When this option is checked, your input value is the default query value and you have the choice of providing a new value to overwrite the default value at run time.
- Click OK to complete the adding the expression value step.
If you choose to add more than one expression value then subsequent adds will have a new option on the dialog. At the top of the dialog you will find text and a drop down choice. Depending on if All or Any of the values in the defined expression are true, either records meeting all the values or records meeting any of the values in the expression are returned in the results.
- Click OK to complete the adding the expressions step.
- Click OK to complete the adding the search layer step.
- Click OK to complete the adding the search step.
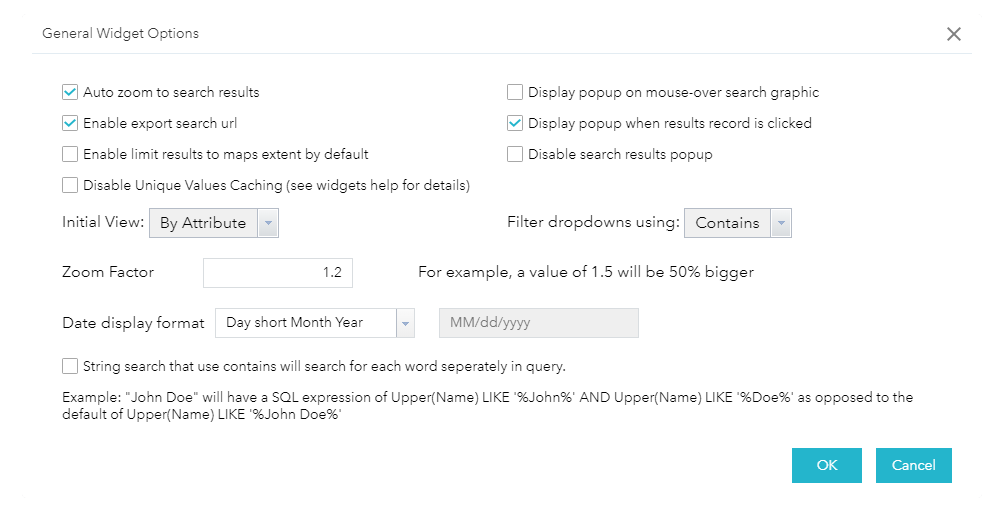
- Optionally, click the Edit General Settings.
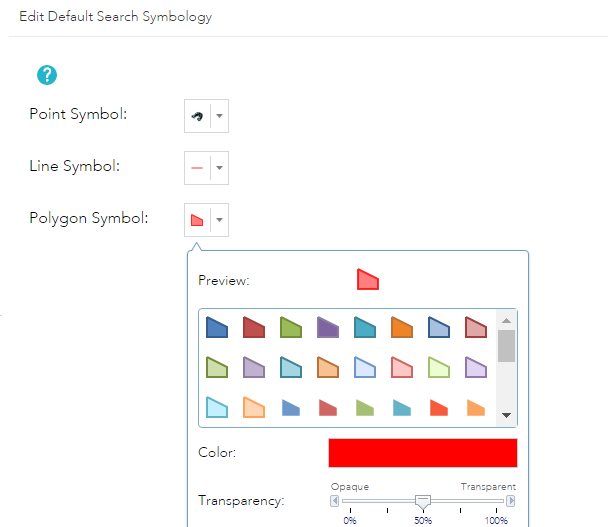
- Optionally, click the Edit Default Search Symbology.
The default symbology dialog opens, allowing you to choose the color and style for the search result symbol if the map service to not return this information.
- Optionally, click the Edit Default Buffer Properties.
The default buffer properties dialog opens, allowing you to choose the color and style for the buffer symbol, the buffer units, the WKID of the buffer, the default buffer distance, and whether the buffer layer is added to the legend (and thus print output).

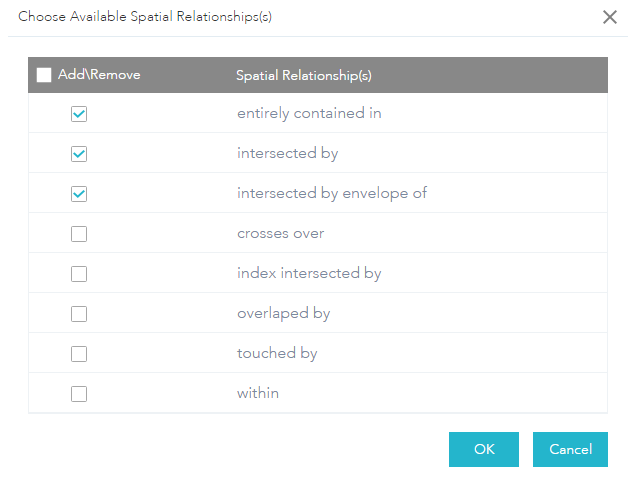
- Optionally, click the Edit Spatial Search Properties.
The spatial search properties dialog opens, allowing you to choose from a list of available spatial search operations that will be made available to the user in the widget.
- Optionally, click the Edit Graphical Search Options.
The graphical search options dialog opens, allowing you to choose from a list of available graphical search drawing tools that will be made available to the user in the widget.

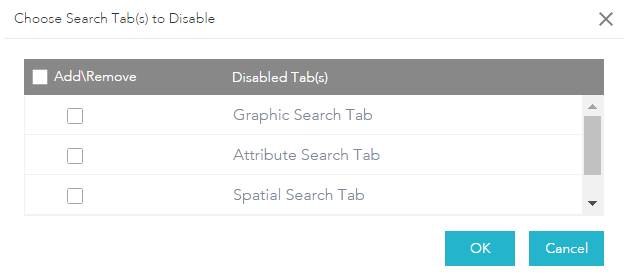
- Optionally, click the Edit Disabled Tab(s).
The disabled tab(s) dialog opens, allowing you to choose from a list of tabs that you want to disable to the user in the widget.
- Optionally, you can customize the No results text that is displayed by editing the noResults property of the widgets nls/strings.js file to add additional instructions/HTML text or links.
This is beneficial when you need to provide further guidance to the end user on what to do if their search does not produce any results. See the blow example and result.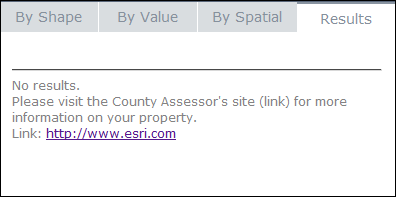
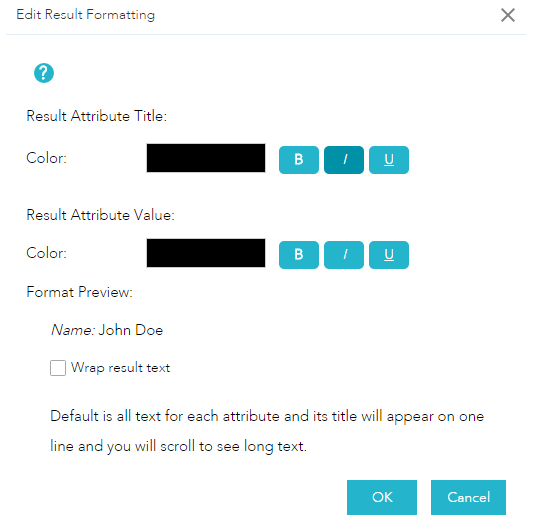
- Optionally, click the Edit Result Formatting.
The result formatting dialog opens, allowing you to choose the color and style for the identify result text.
- Click the OK to complete the widgets configuration.
Using the Enhanced Search widget
Clicking the Enhanced Search widget in your application displays the widget. Depending on the Initial View choice that was made during configuration the By Attribute or the By Shape view will be visible.
By Attribute
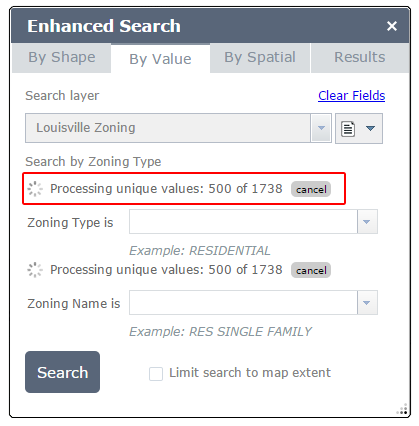
The By Attribute view has a dropdown list of predefined search layers. Selecting a search layer updates the dropdown list of search aliases for that layer (search expressions):
|
- If the search was configured to use Unique then a dropdown list will be presented of all unique values for the configured field. A progress indicator will be presented to show that the widget is busy working with the unique values as highlight in the image above.
- If Ask for values is specified at configuration time, a text box displays prompting you for new value for the parameter. The default value shows in the box initially.
- If the configured search uses a field that has a domain then a dropdown with all coded values will be presented.
- If the configured search was a range then two textboxes or date selectors will be presented.
- If you check the Limit results to maps extent. then the search results will be limited to features that intersect the maps current extent.
- If you checked the Value is required to be entered to enable search then the required expression value will be indicated with "*Required".
- If the expression value is defined as unique values or the field has a coded domain then the drop down list will not contain a blank value like it does when the field is not required.

|
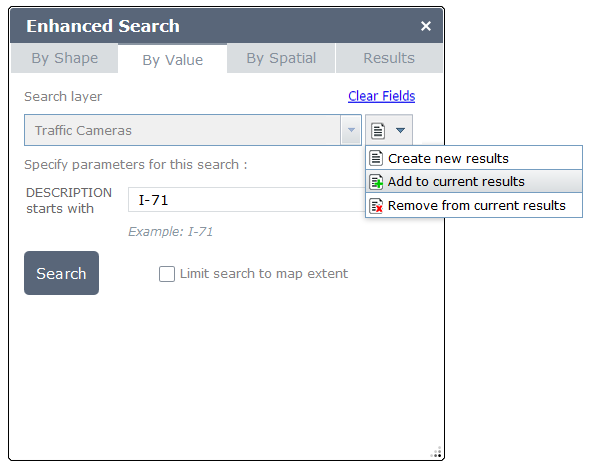
By default all searches create a new result set. But to change the selection dropdown to Add or Remove the search results from the current result set.
|
By Shape
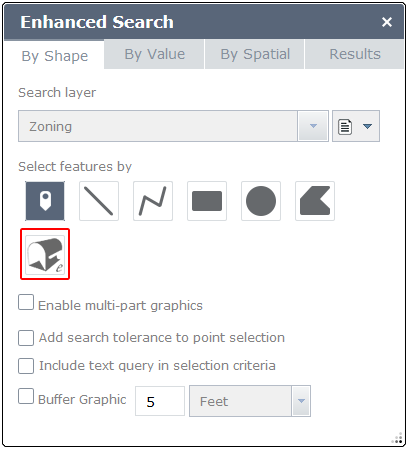
The By Shape view has a dropdown list of predefined search layers and draw tools for drawing on the map to search for features that intersect the drawn graphics.
|
- If you check on the enable multi-part graphics then when you complete drawing on graphic you and can continue to draw the same geometry type and once you have drawn all the graphics you wish to search by then you can click Search to execute the search.
- If you don't check on the enable multi-part graphics then when you complete drawing on graphic the search is automatically executed.
- If you choose the point graphic draw tool and are attempting to search for line or point feature then you should use the Add search tolerance to point selection.
- If you choose you can buffer the graphics after it is drawn but before the search occurs by checking the Buffer Graphic checkbox and adjusting the distance and units if desired.
- If you choose to enable eLocate Widget Graphics in the Edit Graphical Search Options dialog then when you have eLocate result graphics added to the map the eLocate button will appear as a graphical search option.
- If you choose to add or remove from the current search results using graphical searches as well as By Value searches.
By Spatial
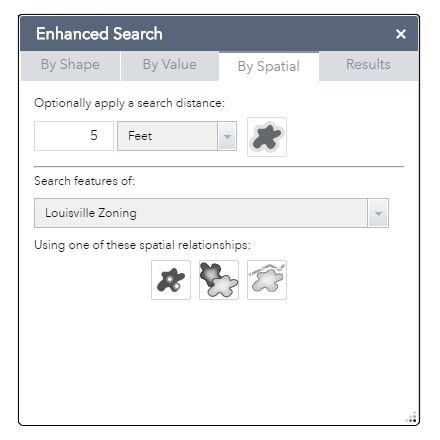
The By Spatial view has buffering options, a dropdown list of predefined search layers and spatial operation buttons.
|
- If have already completed an attribute or graphical search then you can use the spatial search to search for other features that have a spatial relationship to your previous search results.
- If you click the Apply Buffer button than a buffer will be added around your existing search results. This buffer can be used as the geometry of your spatial search instead of the existing search results geometries.
- Choose the layer that you will search for the spatial relationship with your existing search results or buffer.
- Finally select the spatial relationship button that you want to execute. (i.e. entirely contained in).
- A common workflow for using the By Spatial search would be to search for a parcel and determine the parcels that are within 1000 feet of the original parcel. To do this you would follow these steps:
- Search a parcel layer by owner name using the By Attribute Search.
- Switch to the By Spatial view and buffer that result by 1000 feet.
- Select the parcel layer from the drop down layer list and click the intersected by button.
Results
The Results view displays the features returned from the search, and use an alternating color scheme.

|
|
- Click on an individual search result will zoom the map to that result and display the popup for that result.
- If the results layer has links configured than the link text or link image will appears in the results.
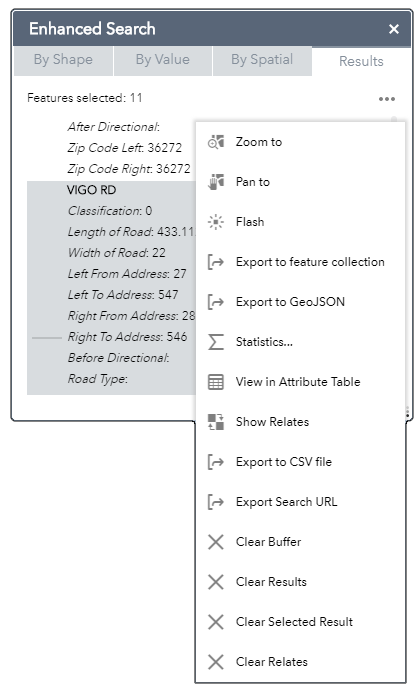
- The ellipses button is new to WAB 2.1 and brings up a menu of result actions you can perfrom.
- The Zoom to command will zoom the map to the extent of all the returned results.
- The Pan to command will pan the map to the extent of all the returned results.
- The Flash command will flash all the returned results on the map.
- The Export to Feature Collection command will export the search results to a Feature Collection JSON file.
- The Export to GeoJSON command will export the search results to a GeoJSON file.
- The Save to My Content command will save this feature to your orgs "My Content".
- The Statistics... command will show a statistics window for numeric field in the result feature.
- The View in Attribute Table command open and send the search results to the Atribute Table widget.
- The Show Relates command opens and sends the search relates to the Atribute Table widget.
- The Export to CSV file command will export the search results to a CSV file.
- The Export Search URL command will take the search options used in an attribute search and export the URL for this search that can be shared with others.
- The Clear Buffer command (when present) will remove the buffer graphic from the map.
- The Clear Results command will remove all the returned results from the map and the widget.
- The Clear Relates command (when present) will remove the relate(s) from the map and Attribute Table.
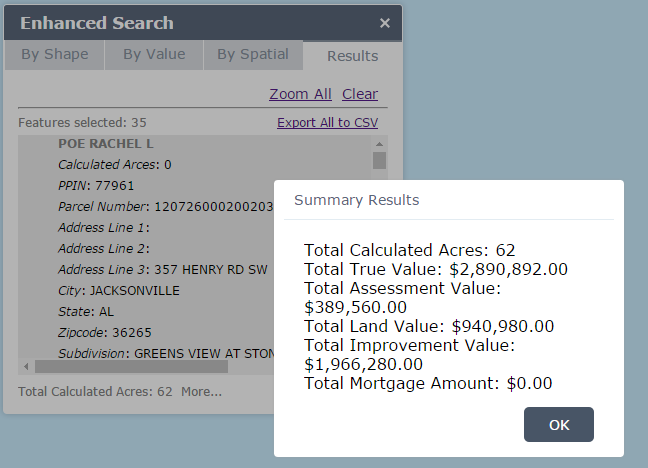
- If you have configured a field or fields to be summed then the value of the first sum field will be shown at the bottom of the results list. If you configured more than one field then the More... option will be shown and when clicked a message box will appear with all the summary results.

|
|
URL Search
The URL Search capability can be used by following these guidelines
- Add the "?" to the url if it does not already have one in the url (if it does then start with "&" instead. Here is an example: ?esearch=1805162001006&slayer=0&exprnum=1
- The esearch parameter needs to be lower case and followed by the equal sign and then the actual search text/number/date or range of dates or numbers.
- The esearch parameter can have more than one search text/number/date if they are separated by a pipe character "|". Here is an example ?esearch=SPECIAL|WATERFRONT&slayer=1&exprnum=0
- The esearch parameter can contain a range, like a date range, if they are separated by a tilde character "~". Here is an example ?esearch=2014-11-10~2014-11-17&slayer=2&exprnum=0
- The esearch has three special key words that can be used for date searches. These key words do what thier names suggest:
- last48 - take the current date and select the last 48 hours from the current date.
- thismonth - take the current date and select the last month from the current date.
- thisyear - take the current date and select the last year from the current date.
- After the esearch parameter add an ampersand and then the slayer parameter and equals sign followed by the search layer id number. The search layer number is simply the number of the search layer that is configured in the widget and is zero based, so the first search layer in the widget is zero. Here is an example: &slayer=2
- After the slayer parameter, add an ampersand and then the exprnum parameter and equals sign followed by the expression id number. The expression id number is simply the number of the expression that is configured in the widget and is zero based, so the first expression in the widget is zero. Here is an example: &exprnum=0
- After the exprnum parameter, you can optionally add an ampersand and then the close parameter and equals sign followed by true. The close parameter will close the eSearch widget once the URL search is done executing. Here is an example: &close=true. This is useful if you want the search results added to the map and/or Attribute Table Widget and do not need the eSearch widget visible after that.
- The widget must be set to "open at start" in order for the widget to execute the search when the app starts.
- To set the widget to "open at start" just click the lower left coner of the widget icon as indicated below.

|
What's New in version 2.x
This is what's new.
- v2.1 - Added three new URL Search keywords dealing with date searches.
- v2.1 - New results actions menu.
- v2.1 - Pan to search results.
- v2.1 - Flash the search results.
- v2.1 - Export the search results to Feature Collection JSON file.
- v2.1 - Export the search results to GeoJSON file.
- v2.1 - Added support to not require a date to be choosen for date searches
- v2.1.1 - Configure if a numeric field is included in the show Statistics dialog.
- v2.2 - Added Dutch localization (thanks to Pieterjan Wintjes).
- V2.2.1 - Added layer specific global overrides for zoom to results and disable popups.
- V2.2.1 - Added default activated graphic tool option.
- V2.3 - Added show attachments option.
- v2.4 - Updated for version 2.4 of WAB.
- v2.4.1 - Updated for WAB on Portal issues.
- V2.5 - Added Relates.
- V2.5 - Hide Null data in widget results and popups.
- V2.6.1 - Added configuration option to auto zoom to buffer results, Date Format, Zoom Extent, and if a string contains search uses each word indivdually or the whole string in the SQL.
- V2.6.1 - Fixed a large number of relates issues
- V2.7 - Added search result selection highlight
- V2.9 - Added ability to specify the search layer and or expression in the url parameters without executing a search.
- V2.9 - Add ability to have null value in the unique dropdown lists
- V2.9 - Added support for non geographic searches (i.e. tables) !!!This feature is in Beta!!!.
- V2.9 - Enhanced the unique value paging to perform much faster if the number of unique vales does not exceed the map services maxRecordCount.
- V2.11 - Urls inside of attributes are now hyperlinked automatically.